(Arvada, CO, USA, October 28th2020) Leading nanometer-level motion control technology innovator — ALIO Industries — is continuing to advocate the examination of the impact of 6D repeatability testing and performance on single and multi-axis motion control systems. Advancements in manufacturing processes and metrology sensors along with the continuing demand from industry to create innovative technologies and products is driving a greater need for motion systems that are both highly accurate and repeatable at the nanometer level.
All motion systems operate in 3-dimensional space and have errors in 6 degrees of freedom (6-DOF). However, motion systems are often only characterized by performance data of a single or subset of these 6-DOF. This practice leaves several error sources unaccounted for in performance data and specifications. ALIO suggests that repeatability performance for metrology inspection and manufacturing systems must now be analyzed and specified using a “point repeatability” method that accounts for 6D spatial errors in order to provide true representation of nanometer-precision performance.
Traditional systems and test methods — plane repeatability. Many traditional stage and motion systems specify repeatability as a single number representing the variation in linear displacement along an axis of travel, i.e. plane repeatability. Historically, this practice was valid as the repeatability specifications were large enough that other error factors were only a small percentage of the total error and could be ignored.
The repeatability of the plane position along the axis is effectively measured over many cycles at a target position. The intersections of this plane with the axis is a point on the axis line and the collection of these points results in 1D repeatability performance.
This test method makes a critical assumption, namely that the plane only moves in one dimension and the axis is perfectly straight. At the nanometer-level, this assumption is not realistic.
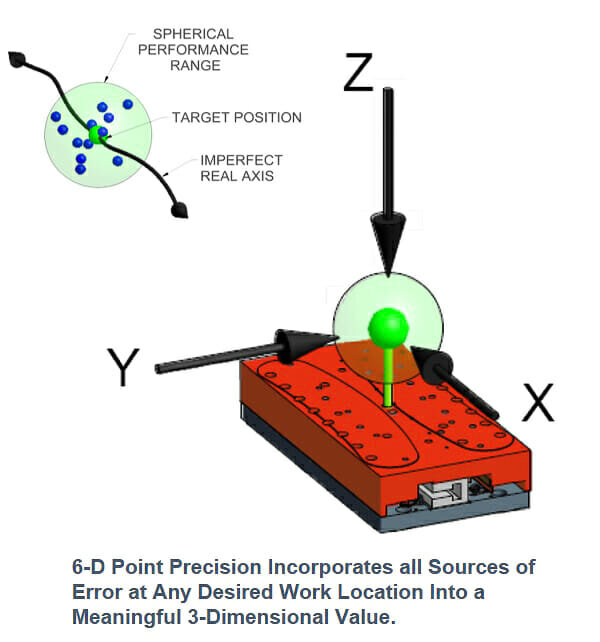
6D nano precision — point repeatability. In nanometer-level precision systems, “other” errors that were previously ignored in less accurate systems often become equal to or greater contributors to the 6D repeatability performance. At the nanometer-level, the axis of travel should actually be shown as bending and twisting through three-dimensional space and thus plane visualization becomes meaningless as it will tip, tilt, and twist as the stage moves along the axis. The stage moves in 6D space, therefore neglecting these additional error sources can result in a misrepresentation of actual stage repeatability performance.
Each linear (or angular) direction the stage moves (or rotates) in results in a positional error in that direction. That motion, which must not be neglected when nanometer-precision is desired, will have an associated repeatability of that error motion. Each point on a stage mounting surface will move in 3D space as of a result of this error motion in 6 degrees of freedom. It is the point repeatability of an infinite number of points attached to a stage, that must be characterized by testing and specification data. Thus, each point repeatability will result in a spherical repeatability range.
Measuring 6D point repeatability. To accurately characterize repeatability, X, Y, and Z components must be measured in a systematic process to characterize the point repeatabilities of a stage along the entire axis. Additionally, a process must be implemented to test the influence of pitch, yaw, and roll errors of the axis and their influence on repeatability. In order to have a high confidence in integrated system performance the motion subsystems must be correctly characterized for 6D performance accounting for all error components of stage motion. Without this, claims of accuracy and repeabality are at best pointless, and at worst knowingly misleading.


