~ Metrology specialist offers demonstrations on first InspecVision 2D and 3D system in UK ~
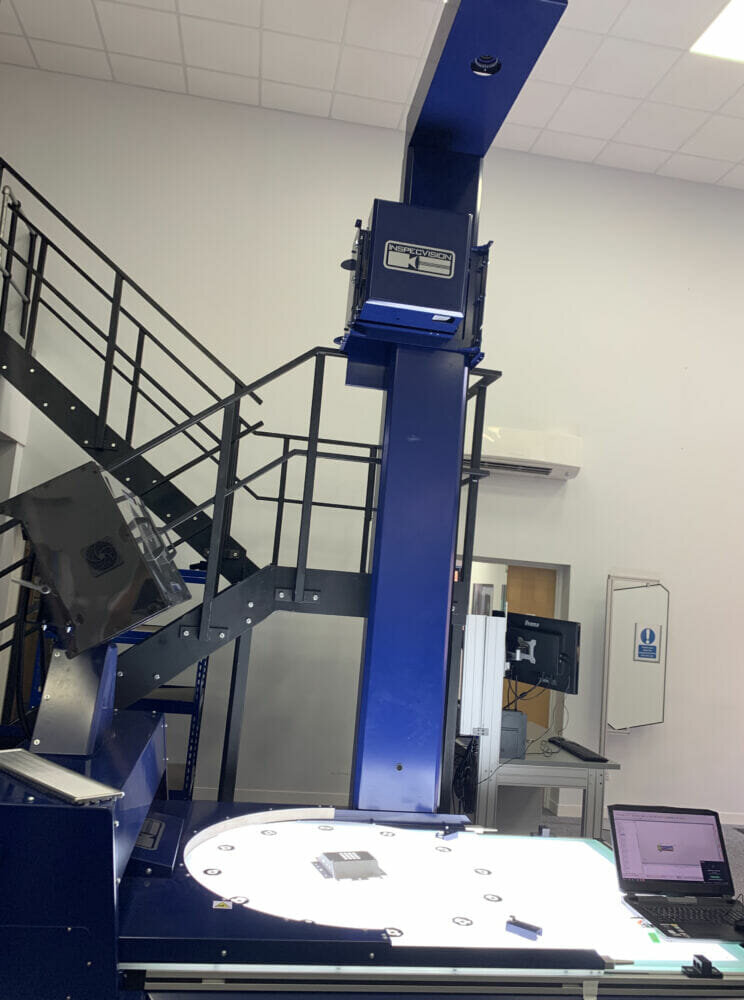
Industrial measurement systems specialist The Sempre Group now offers demonstrations on the UK’s first InspecVision 2D and 3D measurement demo machine. Potential and existing customers can visit The Sempre Group’s Centre of Excellence in Gloucester to see the new features of Planar and Optiscan systems, such as the automated turntable feature for 3D measurement, the SurfScan and 2D repositioning upgrades. UK and Irish manufacturers can use these additions to improve measurement accuracy and integrate 2D and 3D measurement.
InspecVision offers low-cost machinery that businesses can use to carry out one click, single-second field of view 2D, 2.5D and 3D measurements with a single click. Manufacturers, particularly in the automotive and sheet metal industries, can use these systems to measure and obtain traceable results, without the need for hand tools or manual input. They can also link the system to computer aided design (CAD) models to easily show users if a part is in or out of tolerance with overlayed colour mapping.
The Sempre Group can provide expert demonstrations of the technology, including the range of add-ons, such as the SurfScan. The system is a high-resolution projector that can be simply retrofitted onto an existing Planar vertical column. This allows manufacturers to improve the accuracy of their 2D and 2.5D inspection, without investing in an entirely new and possibly costly system. The addition enables businesses to accurately inspect forms, louvres and small bends with a single click, streamlining measurement of complex parts.
Sempre can also demonstrate the 2D repositioning Planar add-on to customers looking for an unbiased opinion about the technology. OEMs can use the system’s integrated optical markers to measure parts larger than the base table in one cohesive process. The systems stitches 2D scans together, removing the manual and time-consuming process of accurately repositioning parts. Ultimately, this allows manufacturers to invest in one system, rather than multiple for different sized components, potentially saving thousands.
“The LED ring around the camera is a great addition for manufacturers who want to improve the system’s visibility and inspection accuracy because automatically helps determine the movement of a 2D part,” explained Mike G John, head of engineering at The Sempre Group. “When this is partnered with the Opti-Scan 1000.35 and the automated turntable, manufacturers can collect eight times the number of 3D measurements, compared to a typical scan rotation. Manufacturers can set up a demonstration to see how they can rapidly and accurately collect and analyse data to improve their productivity, ensure accuracy and reduce waste.”
With the help of The Sempre Group’s installation and service team, OEMs can install any of these additional components onto pre-existing InspecVision Planar systems. The Sempre Group offers full suite of metrology solutions from a broad supplier base, including software and hardware, so businesses can find a solution that is specifically tailored to their needs.
To organise a visit to the showroom and a demonstration of the InspecVision range, visit https://www.TheSempreGroup.com/.


