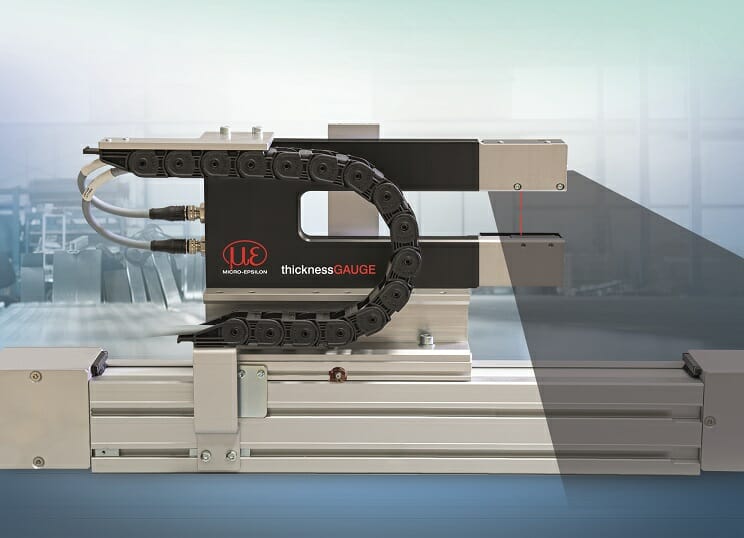
Precision sensor supplier Micro-Epsilon has introduced a gauge for precise thickness measurements of strip materials, plate and sheet, up to 25mm thick. A complete ‘out-of-the-box’ solution for thickness gauging and quality control, the system offers precise measurement from ± 0.25µm and fills the gap that currently exists in the market between basic thickness sensors and higher cost, dedicated inline thickness measurement systems.
The new thicknessGAUGE measurement system from Micro-Epsilon is suitable for both offline and inline thickness gauging and is available in several versions that use one of three different sensor types – laser triangulation, laser profile or confocal chromatic sensors. The flexibility of technology selection from Micro-Epsilon’s own portfolio of sensors ensures optimum results are achieved based on the surface type, material to be measured and the performance requirements of each customer. The system also offers different measuring ranges and measuring widths to suit a wide range of applications.
The fully assembled thicknessGAUGE system comprises a stable frame on which two optical distance sensors are fixed, which measure the thickness of the target material using the ‘difference’ principle. Before being shipped to the customer, the sensors are perfectly aligned to each other on the frame and factory-calibrated for the application. The specific linearisation of the sensors in the frame means that the complete system accuracy is better than the individual sensors combined. The entire system is powered via a 24V power source, which makes the installation and integration work as simple as possible.
The thicknessGAUGE is mounted on a linear axis with electromechanical drive that moves the sensor system from the ‘home/park’ position to the required measuring position. Depending on the application requirements the system can be operated in traversing mode, scanning back and forth continuously, or in fixed track mode where a specific point, often the centreline, is taken for gauge control. The system can also be set to edge mode for control of the material edge thickness.
thicknessGAUGE is equipped with an automatic calibration unit, consisting of a certified gauge block that is measured periodically as part of the traversing process. The use of a gauge block as part of the system ensures optimum accuracy is maintained and accounts for the effects of fluctuating temperatures and changes in the distance of the measurement gap. The calibration cycles are individually adjustable to the customers’ needs, take just seconds to complete and being part of the gauge means the process never has to stop.
Powerful analysis and control software
All thicknessGAUGE systems are supplied with a multi-touch panel industrial PC that is pre-installed with the thicknessCONTROL software package from Micro-Epsilon. This is the same software used in the high end measurement systems and provides convenient touch gesture control similar to that of modern smart phones. The measured process values can be displayed in multiple ways, including simple large values of thickness, cross profiles and length trends or combinations of each. The different measurement modes such as fixed track thickness measurement at any position, traversing measurement of the thickness cross profile, and 3 or 5 track measurement of longitudinal thickness trends can be selected. Full SPC data of the measurements is available and an automated verification of the system’s capability can be completed by the customer themselves.
Other features for documentation and process control include an article database, production archive, statistical evaluations, as well as limit value monitoring with ‘return back to production’ using (optional) digital fieldbus interfaces.
Glenn Wedgbrow, Business Development Manager at Micro-Epsilon comments: “It is often the case that customers will attempt to create simple thickness measurement solutions using individual sensors, without paying attention to the issues of mechanical setup changes, calibration and usability. Whilst the costs at first glance may seem low, this solution typically ends up with an unsatisfactory measurement performance and much more money wasted in attempting to rectify the issues. The thicknessGAUGE system removes those concerns as it is delivered complete and is ideal for inline thickness measurements of any plate production and strip processes to measure the thickness of the materials on a continuous basis.”
“The systems are also designed in such a way that they can be used as both initial equipment and for retrofitting to existing facilities. The compact nature of the thicknessGAUGE makes it ideal for fitting into restricted spaces. Potential applications include the measurement of plastic film, woven materials, wood and ceramics, as well as metal film, strip and plate materials. In particular, the new fields of battery production with its combination of materials for fuel cells and battery film, coated or uncoated, are perfect examples of applications for this type of system.”
Laser triangulation for common surface types
The thicknessGAUGE.laser systems use laser triangulation sensors for thickness measurements. These laser sensors enable high measuring rates (up to 4 kHz) at high speeds and measurement accuracies to ±4 / ± 20µm. The lower cost system is ideal for measuring the thickness of common standard surface types such as plastics, wood and metals, including strip, sheet and plate materials. The linear unit allows thickness measurements up to 400mm strip/plate width.
Confocal sensors for outstanding accuracy
The thicknessGAUGE.confocal sensor systems use confocal chromatic displacement sensors for thickness measurements. The sensors allow for measurements to be performed with outstanding accuracy (±0.25µm, 2 sigma) and high measuring rates (up to 5 kHz). In addition, this innovative measurement technique enables measurements of complex materials such as reflective and shiny surfaces, as well as transparent and semi-transparent materials, in continuous strip or sheet form, up to 400mm widths.
Laser profile sensors for structured materials
The thicknessGAUGE.laser profile sensor systems use laser profile scanners for thickness measurements. The laser profile scanners project a laser line onto the surface to be measured, which compensates for any strip tilting and enables profile averaging. The laser line measurement technique enables measurement of structured materials and materials with geometric patterns including embossed surfaces or perforated plate. The system measures to an accuracy of ±0.5µm at measuring rates up to 100Hz.
For more information on thicknessGAUGE, please call the Micro-Epsilon sales department on +44 (0)151 355 6070 or email info@micro-epsilon.co.uk


