Bowers Group has assisted DMPS in the development of an advanced rail tip measurement solution that reduces inspection of milling wheels time by 97.5%, transforming industry standards.
Collaborating with its distributor, H. Roberts, Bowers Group worked to construct a tailored solution for the tip measurement station, enabling the system to work effectively and offer improved accuracy, reliability, and efficiency.
Andrew Yarrow of DPMS said: “We believe our rail tip measurement system has the ability to transform rail maintenance globally. Collaborating with Bowers Group has been instrumental in achieving our goals of functionality and accuracy. Together, we navigated challenges to develop a system that prioritises accuracy, user efficiency, and safety in a high-risk industry.”
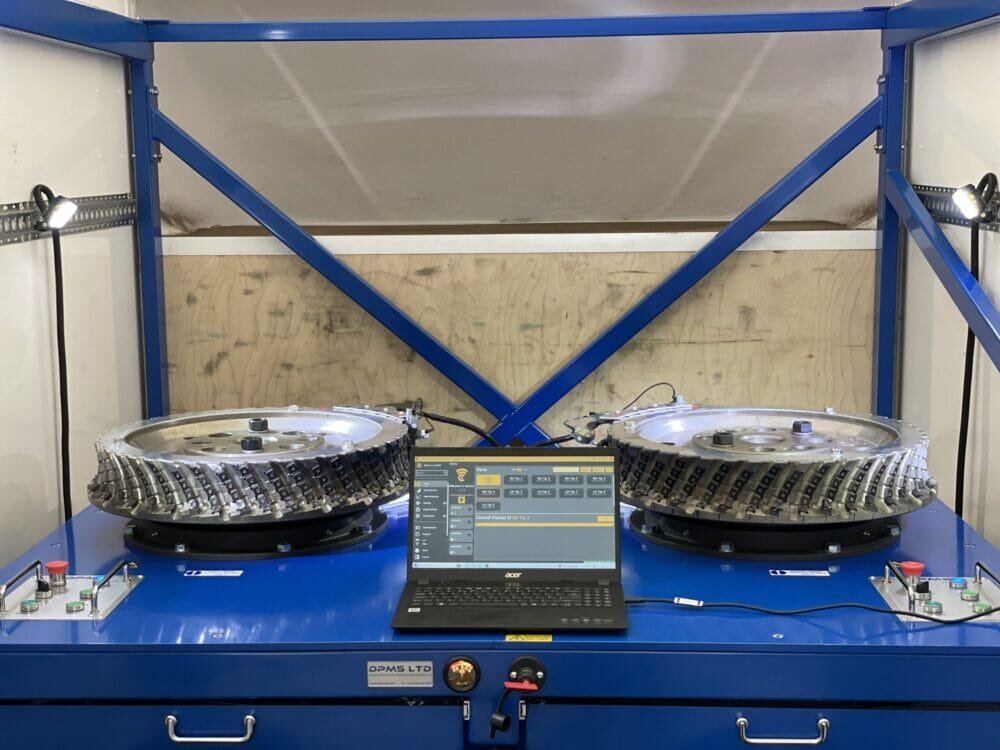
DPMS specialises in the design and production of bespoke machinery and equipment used across various sectors, including rail. Recognising the intricate nature of rail head grinding and the requirement for enhanced safety practices, it embarked on a project to develop an improved system. The objective was to create a mobile service centre, equipped with handling apparatus and a fitting table with automated calibration to provide a solution capable of serving operators and train manufacturers globally.
Rail operators work tirelessly to maintain and upgrade track infrastructure to ensure smooth operation. A key aspect of this is the milling process, where train-mounted wheels with rotating carbide tips remove irregularities and defects from rail surfaces, enhancing train performance and safety.
Consistent monitoring and maintenance are essential for effective rail grinding, but environmental challenges away from maintenance centres can complicate the process. Inaccurate measurement of milling wheel cutting heads can lead to uneven rail surfaces, affecting train stability and comfort, and causing excessive wear and tear on both the grinding wheel and the rail.
DPMS developed a tip measurement station that allows for synchronised inspection of both the left and right milling wheels and is tailored to lift grinding wheels from the track and relocate them into a mobile unit.
Once the wheels are positioned on a jig and firmly fixed in place within the unit, a frame containing five reader heads is gradually moved to a reading position. These reader tips gauge the highest point of each tip in their respective rows. The wheels are rotated via a motor, allowing the reader tips to capture the highest point of each cutter and transmit the collected data to a control sheet.
However, in its initial design, the original setup encountered practical challenges due to mounting constraints as it required setting the indicators on separate stands, preventing simultaneous measurements. The initial set up for its Bluetooth data transfer also encountered challenges due to the large volume of data collected, slowing down the process.

To resolve the issue, dial indicators were replaced with Sylvac P5i Inductive Probes, enabling a direct connection to a laptop.
Specially designed for comparative measurement, these inductive measuring probes by Sylvac offer long-lasting precision bearing guidance tested up to 13 million cycles. They ensure high data speed whilst being IP65 protected. The probes work seamlessly with Sylcom, offering versatile functionality such as displaying values in various modes, uploading part drawings with dimensions, showcasing agreed tolerances, and indicating pass/fail readings. Bowers Groups team of experts were able to develop a customised reporting program, using Sylcom, that allows for data to be exported to Excel for report generation for fast and accurate results.
This new system enabled all five readout heads to be mounted in a stack, allowing immediate measurements and collecting data simultaneously making the process more accurate. It also allows for more measurements to be taken at the same time, allowing for an increase in measurement volume within a reduced amount of time. This process removes the need for manual measurement input and, with a simple start, stop, and speed adjustment functionality, offers a simple, user-friendly interface.
As a result, this adjustment significantly improved data reliability whilst drastically reducing the measuring time for both left and right milling wheels, with inspection time falling from over 1 hour to just 90 seconds.


