Profile projectors are ultra-reliable tools in various industries, but with increasing demands on measurement accuracy, could a digital upgrade enhance their performance?
A profile projector, also known as an optical comparator, is a precision measurement device used to inspect the dimensions and geometry of small parts and components. It projects the magnified silhouette of an object onto a screen, allowing for detailed examination and measurement using either an overlay or XY drives. This type of projector is easy to use and is prevalent in many workshops around the world.
The capability of an optical comparator can be significantly enhanced with PC-based software, providing increased functionality and automation. The key benefits include:
- Increased Accuracy: Digital systems minimize human error, thereby improving measurement precision.
- Data Management: Simplifies the storage, retrieval, and analysis of measurement data.
- Enhanced Productivity: Enables faster measurements and easier comparisons using digital tools.
- Integration: Facilitates integration with other digital systems in the manufacturing process.
Key Advanced Features of Digitizing Software
Modern digitizing software offers several advanced features that enhance the functionality of optical comparators:
- User-Friendly Interface: Easy-to-use touch screen software.
- Part Alignment: Features for skew and datum alignment.
- Playback Routines: Allows playback of measurement routines and programs.
- Automatic 2D Profile Scanning: Scans geometric features, individual features, or all visible features with a single mouse click.
- Profile Digitization: Exports 2D profiles via DXF format.
- Smart Measurement: One-click feature measurement with smart auto-recognition.
- Representation Building: As a component is measured, its representation is built on the screen. The user can click on measured features to display dimensions as they would appear on a drawing.
- Automatic Detection Tools: Fully automatic optical detection tools are available in both manual and CNC modes, ensuring fast and repeatable results without relying on operator skill.
- Geometric and Complex Shape Measurement: Powerful tools allow for easy measurement of both geometric and complex shapes.
- Feature Dimensions: Dimensions can be called up by clicking on measured features or by fitting measurement points against a DXF file.
- Advanced Tools: Includes edge detection, cross hairs (full and mouse), centre line detection, “smart measure,” “all edge points” function, “thread measure” tool, and a “screen ruler” for quick measurements between any two points on the image.
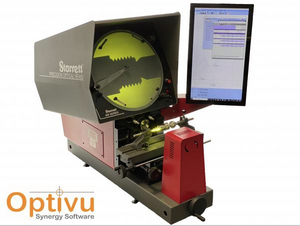
Example Software: Optivu Synergy
Optivu Synergy software, available from Optimax, is revolutionary and can be retrofitted to most optical projectors. The software is installed, supported, and calibrated by UKAS qualified engineers. It provides:
- Automated and Manual Modes: Suitable for both manual and CNC operation.
- Efficient Measurement: Ensures quick and accurate measurement processes.
By digitizing your optical comparator with advanced software like Optivu Synergy, you enhance its capability, accuracy, and productivity, making it a more powerful tool for precision measurement.
For more information, visit Optimax.
Automation may not be available on all makes of Shadowgraph.

